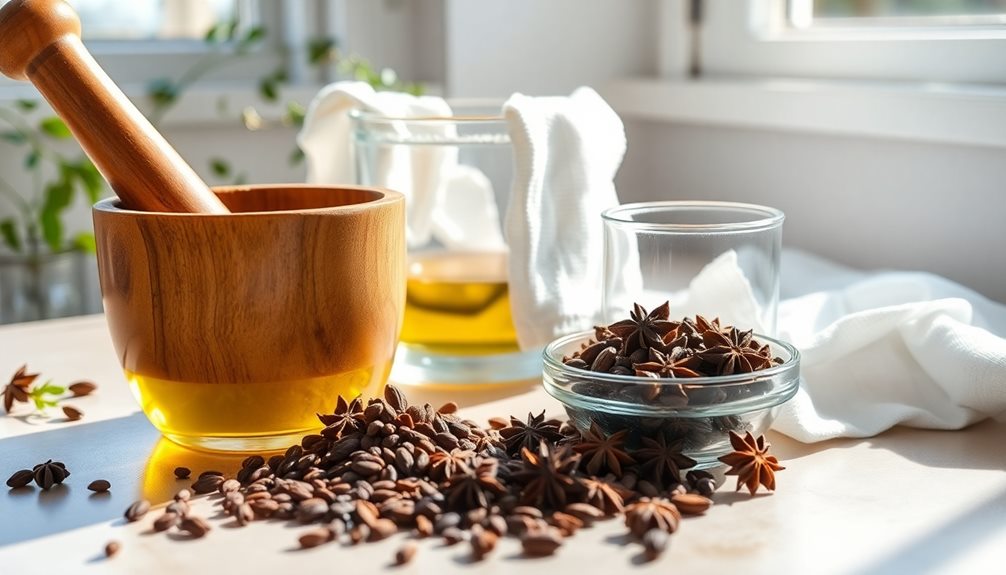
You can easily create your own anise essential oil from the seeds of *Pimpinella anisum*. Start by thoroughly grinding dried anise seeds, then mix them with a high-quality carrier oil in a glass container. Seal it tightly and place it in direct sunlight for 1 to 2 weeks, shaking gently every few days to enhance extraction. This method harnesses the antibacterial and antifungal properties of anise oil, making it beneficial for digestion and relaxation. Afterward, strain the mixture using cheesecloth for a pure final product. Keep exploring to uncover more about the unique benefits and uses of anise oil!
Summary
- Anise oil, derived from Pimpinella anisum seeds, offers antibacterial and antifungal benefits for skin and respiratory health.
- Its primary compound, anethol, is crucial for aroma and therapeutic effects, enhancing digestion and inflammation relief.
- To make homemade anise oil, grind dried anise seeds and infuse them in a carrier oil using sunlight extraction.
- Use high-quality carrier oils like almond or jojoba; ensure seeds are fully submerged for optimal extraction.
- Strain the mixture through cheesecloth after infusion, storing the oil in a cool, dark place for best preservation.
Antibacterial and Antifungal Properties
When you explore the antibacterial and antifungal properties of anise oil, you'll find it's a powerhouse for natural health. This essential oil, extracted from the seeds of the Pimpinella anisum plant, boasts remarkable abilities to combat harmful microorganisms.
The antibacterial properties of anise oil come from its rich composition, primarily anethole, which disrupts the cell membranes of bacteria, effectively inhibiting their growth. Additionally, like cilantro essential oil, anise oil can provide significant antimicrobial support, enhancing your body's defense mechanisms.
You might be surprised to learn that anise oil doesn't just stop at bacteria; it also exhibits potent antifungal properties. It can fight off various fungal strains, making it a valuable ally in preventing infections and promoting overall wellness.
If you're dealing with skin issues or respiratory infections, incorporating anise oil could provide significant benefits.
Using anise oil in your routine can enhance your natural defense against pathogens, giving you peace of mind. Whether you choose to diffuse it, apply it topically (diluted with a carrier oil), or add a few drops to your cleaning products, you're tapping into a natural remedy that's been trusted for centuries.
Embrace the healing potential of anise oil and elevate your health regimen today!
0-90% Anethol Content
Anethol is the primary compound that gives anise oil its distinct aroma and many of its therapeutic benefits, but what happens when there's a 0% anethol content?
Without anethol, the anise oil composition shifts dramatically. You lose the characteristic sweet, licorice scent that many people adore. Additionally, much like the benefits of black pepper essential oil, the absence of anethol means that the oil's renowned health benefits, such as antibacterial and antifungal properties, diminish considerably.
When anise oil contains no anethol, it may lack the effectiveness associated with digestive relief or respiratory support. The oil's potential as a natural remedy for conditions like muscle spasms and inflammation can also be compromised.
Fundamentally, you're left with a product that doesn't deliver the same therapeutic impact.
In culinary applications, a 0% anethol oil would fall flat, failing to provide the rich flavor that enhances dishes and beverages.
Homemade Anise Oil Instructions
Making your own anise oil at home is a rewarding process that allows you to harness the aromatic and therapeutic properties of this ancient herb. Anise oil, derived from the seeds of the Pimpinella anisum plant, has been celebrated for its various health benefits, including digestive support and its calming effects.
Additionally, like caraway seed essential oil, anise oil offers antimicrobial properties that can further enhance its usefulness in various applications digestive support. By creating your own oil, you not only guarantee its purity but also customize it for your personal use, whether for culinary, therapeutic, or cosmetic applications.
The process is simple and requires minimal ingredients. You'll be extracting the essential oil from dried anise seeds using a carrier oil, which serves as a base for the extraction. This method allows the flavorful and fragrant compounds to infuse into the carrier oil, resulting in a delightful anise oil that can be used in a variety of ways. Follow the steps below carefully to enjoy your homemade creation.
Ingredients:
- Dried anise seeds
- Carrier oil (e.g., almond oil)
- Mortar and pestle
- Cheesecloth
- Glass container
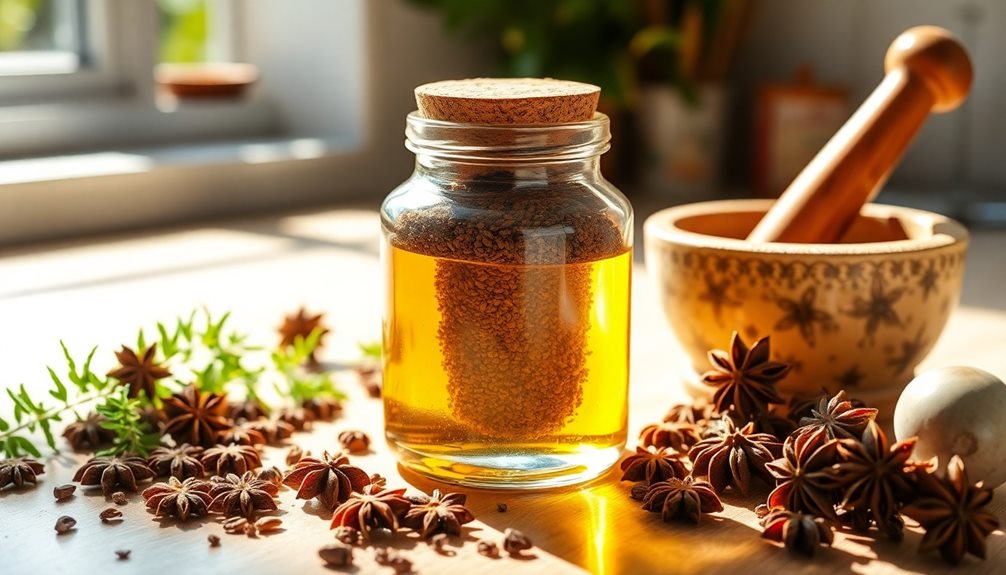
To create your anise oil, start by grinding the dried anise seeds in a mortar and pestle until they release their aroma and oils. Next, fill a glass container with the ground seeds, ensuring they're evenly distributed.
Pour your chosen carrier oil into the container, completely submerging the seeds. Seal the container tightly and place it in a sunny spot for a few days to allow the oil to extract the flavors and properties from the seeds. After three to five days, strain the mixture through cheesecloth to remove the solid seed particles, and transfer the finished oil into a storage container.
When making your anise oil, it's important to verify that your glass container is clean and dry to avoid contamination. Additionally, store the oil in a cool, dark place to preserve its freshness and potency.
If you wish to enhance the flavor further, consider letting the oil infuse for a longer period before straining. This homemade anise oil makes a wonderful addition to your kitchen, skincare routine, or even as a thoughtful gift for friends and family who appreciate natural products.
Sunlight Extraction Process
The sunlight extraction process is a simple yet effective method for infusing carrier oil with the aromatic and therapeutic properties of anise seeds. This technique allows you to create your own homemade anise oil recipe while harnessing the power of natural sunlight. You'll find that this method not only enhances the oil's fragrance but also preserves the beneficial compounds found in anise.
Here's a quick overview of the sunlight extraction process:
| Step | Description | Purpose |
|---|---|---|
| 1. Prepare Seeds | Grind dried anise seeds to release their oils. | Maximizes oil extraction. |
| 2. Combine Ingredients | Fill a glass container with ground seeds and carrier oil. | Prepares for sunlight infusion. |
| 3. Sun Exposure | Seal the container and place it in direct sunlight for several days. | Extracts the essence of anise. |
Using this method for anise oil production is not only rewarding but also connects you to the essence of the anise plant. After a few days, your oil will be ready for use, bringing the delightful aroma and benefits of anise right into your home.
Step 1. Grind Anise Seeds Thoroughly
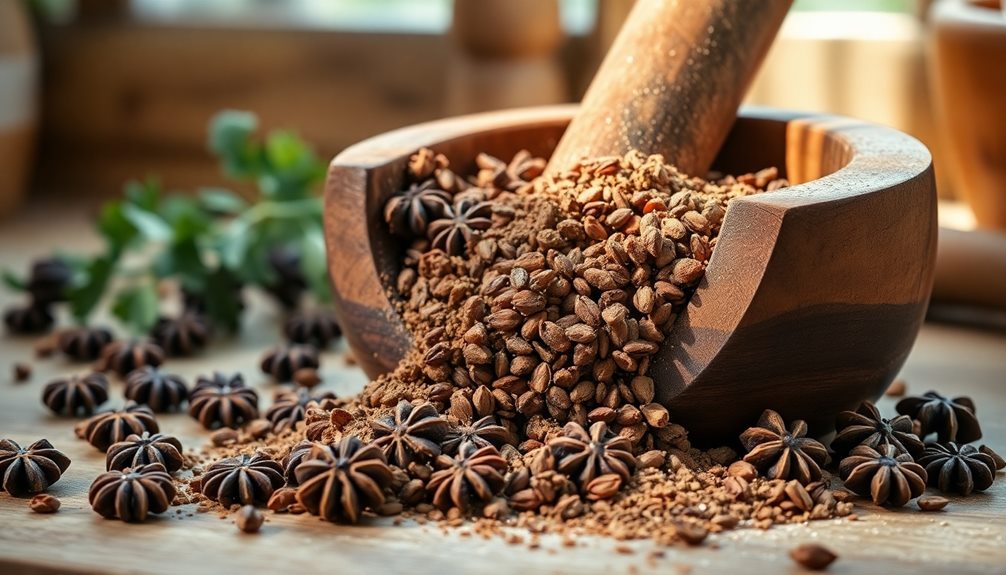
To guarantee you extract the maximum flavor and therapeutic benefits from your homemade anise oil, thoroughly grinding the anise seeds is fundamental. This step not only enhances the aroma but also releases the oil's potent compounds, making your final product richer and more effective.
The process of grinding is vital as it prepares the seeds for ideal infusion with the carrier oil, similar to how harnessing allspice enhances its therapeutic properties.
Start by using a mortar and pestle to crush the dried anise seeds. Apply steady pressure and rotate the pestle, ensuring you break down the seeds into a fine powder. Aim for a texture that resembles a coarse flour—this allows for better infusion when you mix it with the carrier oil later on.
If you find it challenging to achieve the desired consistency, you can also use a spice grinder for a quicker result.
As you grind, take a moment to inhale the sweet, licorice-like scent that wafts from the seeds. This aromatic experience is a reminder of the incredible flavor and health benefits you'll soon unveil.
Once you've ground your anise seeds thoroughly, you'll be well on your way to learning how to make anise oil that's both fragrant and therapeutic, perfect for culinary and cosmetic uses.
Step 2. Add Carrier Oil Completely
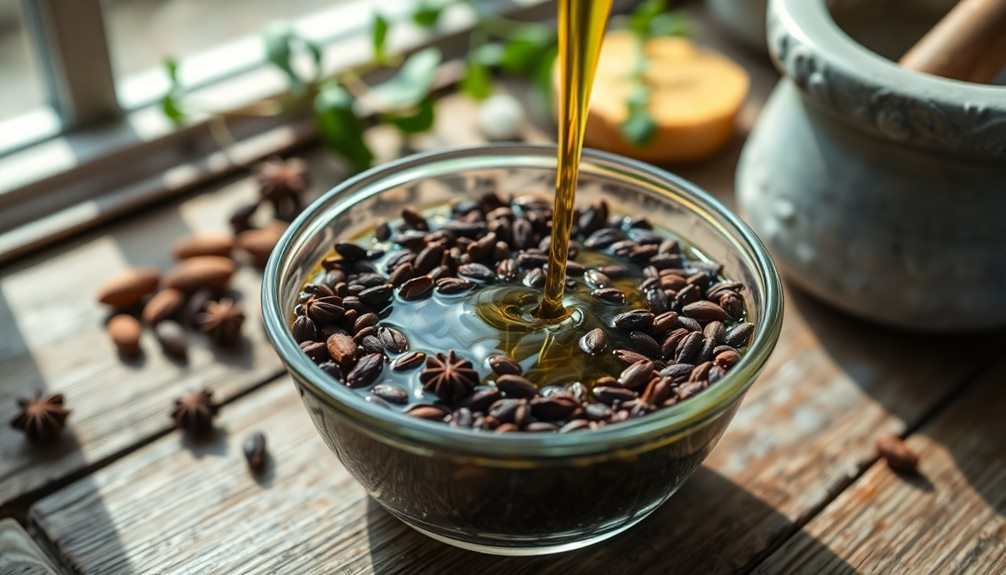
Once you've ground the anise seeds to a fine powder, it's essential to add the carrier oil completely to guarantee ideal extraction of the oil's beneficial compounds.
The carrier oil not only helps dissolve the aromatic components but also makes sure you capture the rich essence of anise oil, which has its origins in the Mediterranean and Asia.
Additionally, similar to the invigorating properties of citronella, anise oil can provide a soothing aroma that enhances relaxation and well-being.
Here's what you need to remember when adding your carrier oil:
- Choose a high-quality carrier oil like almond or jojoba.
- Ensure the oil completely covers the ground anise seeds.
- Stir gently to combine and release the anise's aromatic compounds.
- Allow the mixture to sit, letting the carrier oil absorb the beneficial properties.
- Keep in mind anise oil safety; always test for allergies before use.
Step 3. Seal and Sunbathe Container
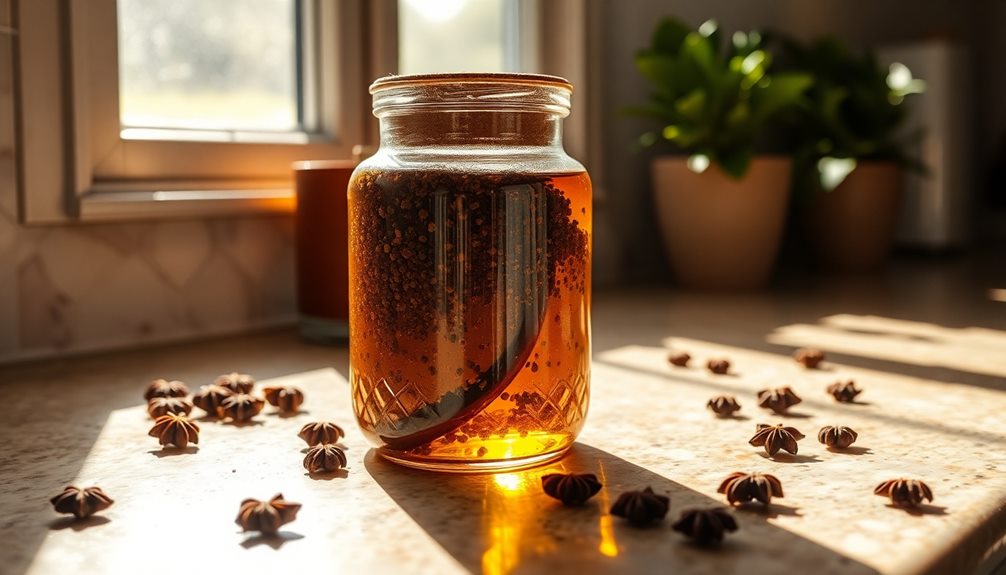
After guaranteeing the carrier oil completely covers the ground anise seeds, sealing the container is your next step. Use an airtight lid to prevent any air from entering, which could degrade the quality of your homemade anise oil recipe. This is vital for preserving the anise essential oil's aromatic properties and health benefits.
Additionally, the infusion process can enhance the oil's calming effects, similar to how the calming properties of Balsam oil are harnessed for relaxation and emotional balance.
Once sealed, find a sunny spot in your home where the container can bask in the sunlight. The warmth will help extract the flavorful and fragrant compounds from the anise seeds, infusing the oil with their essence. Aim to leave the container in the sun for about 1 to 2 weeks, giving it a gentle shake every few days. This encourages the infusion process and guarantees the oil interacts well with the seeds.
During this time, you're not only creating a high-quality anise essential oil but also engaging with nature's alchemy.
After the infusion period, you'll be ready to move on to the next step of straining your oil. This simple yet essential phase transforms your seeds into a potent, aromatic oil, ready for use in cooking, skincare, and wellness applications.
Step 4. Seal and Extract Flavor
How do you guarantee that the rich flavors and aromas of anise are fully extracted into your oil? The secret lies in how you seal and store your homemade anise oil recipe. Here's how to maximize flavor extraction:
- Use a dark glass container to protect the oil from light. This is similar to how chamomile essential oil is crafted to assure its soothing properties are preserved.
- Seal it tightly to prevent air exposure, which can degrade the oil.
- Place it in a warm, sunny spot, as heat encourages the infusion process.
- Let it steep for several days, allowing the anise's essence to meld with the carrier oil.
- Shake it gently every day to help release more flavor.
After sealing your container, the anise seeds will release their essential oils, infusing the carrier oil with that sweet, licorice-like flavor.
This anise oil in cooking can elevate your dishes, making them aromatic and unique. The longer you let it sit, the richer the flavor becomes, perfect for drizzling on desserts or enhancing savory recipes.
With patience and the right conditions, you'll achieve a beautifully fragrant oil that reflects the essence of anise. Enjoy your culinary adventures with this delightful homemade infusion!
Step 5. Strain Mixture With Cheesecloth

Now that your anise seeds have steeped in the warm sunlight, it's time to strain the mixture with cheesecloth to reveal the aromatic oil you've created.
First, gather your cheesecloth and a clean glass container. Place the cheesecloth over the container, ensuring it's wide enough to catch all the anise seeds while allowing the oil to flow through. The process of extracting essential oils can be quite rewarding, as you may find that certain oils, like bergamot, also have uplifting effects on mood and stress levels, making them a great complement to your homemade creations uplifting and calming properties.
Carefully pour the mixture from the sunlight-exposed jar over the cheesecloth. As the liquid seeps into the container, you'll notice the fragrant aroma of the anise oil filling the air.
Gently pull the edges of the cheesecloth together to form a pouch, and squeeze out any remaining oil from the seed pulp. This step is vital, as it maximizes the yield of your homemade anise oil recipe.
Once you've extracted all the oil, discard the leftover seeds. Store your freshly strained anise oil in a cool, dry place, ideally in a dark glass bottle to preserve its potency.
Congratulations! You've successfully created your very own anise oil, ready to be used in culinary delights, therapeutic applications, or beauty products. Enjoy the benefits and aromatic charm of your homemade creation!
Final Thoughts
Isn't it satisfying to create something as versatile and fragrant as homemade anise oil? This delightful oil not only enhances your culinary creations but also offers a range of therapeutic benefits, including its potential to support digestion and respiratory health, much like the calming properties of Angelica Root essential oil.
As you explore its uses, keep in mind some essential anise oil precautions to guarantee safe enjoyment.
- Promotes digestive health
- Acts as a natural insect repellent
- Serves as an antiseptic for minor wounds
- Enhances relaxation and sleep quality
- Adds a distinctive flavor to your favorite recipes
The therapeutic benefits of anise oil are impressive, from alleviating digestive discomfort to acting as a decongestant. However, it's vital to use it wisely. Always dilute it with a carrier oil and avoid high doses, particularly if you're pregnant, nursing, or have allergies.
If you're considering using anise oil for children, consult a healthcare professional first.
Incorporating homemade anise oil into your life can be a rewarding experience. With its rich history and myriad benefits, you'll find endless ways to enjoy and share this aromatic treasure.
FAQ
Can Anise Oil Be Used for Aromatherapy?
Yes, you can use anise oil in aromatherapy. Its sweet, warm scent promotes relaxation, relieves stress, and can enhance your mood. Just remember to dilute it properly before adding it to your diffuser or bath.
What Are the Potential Allergies Related to Anise Oil?
When using anise oil, you should be cautious of potential allergies. Symptoms may include skin rashes, nausea, or headaches. If you're unsure, it's best to consult a healthcare professional before trying it.
How Do I Store Homemade Anise Oil?
You should store homemade anise oil in a cool, dark place, preferably in a glass container. Make certain it's tightly sealed to preserve its aroma and potency, avoiding exposure to heat and sunlight for ideal longevity.
Can Anise Oil Be Ingested Safely?
You can ingest anise oil safely in small amounts, but it's essential to use food-grade oil. Always consult a healthcare professional, especially if you're pregnant, nursing, or have underlying health conditions. Moderation's key!
What Are the Skin Benefits of Anise Oil?
Anise oil promotes skin health by combating bacteria, reducing inflammation, and soothing irritation. Its antioxidant properties help protect against environmental damage, while its fragrance enhances mood, making it a delightful addition to your skincare routine.